Como instalar seus produtos MineralStream
Passos simples para uma experiência de banho luxuosa e saudável
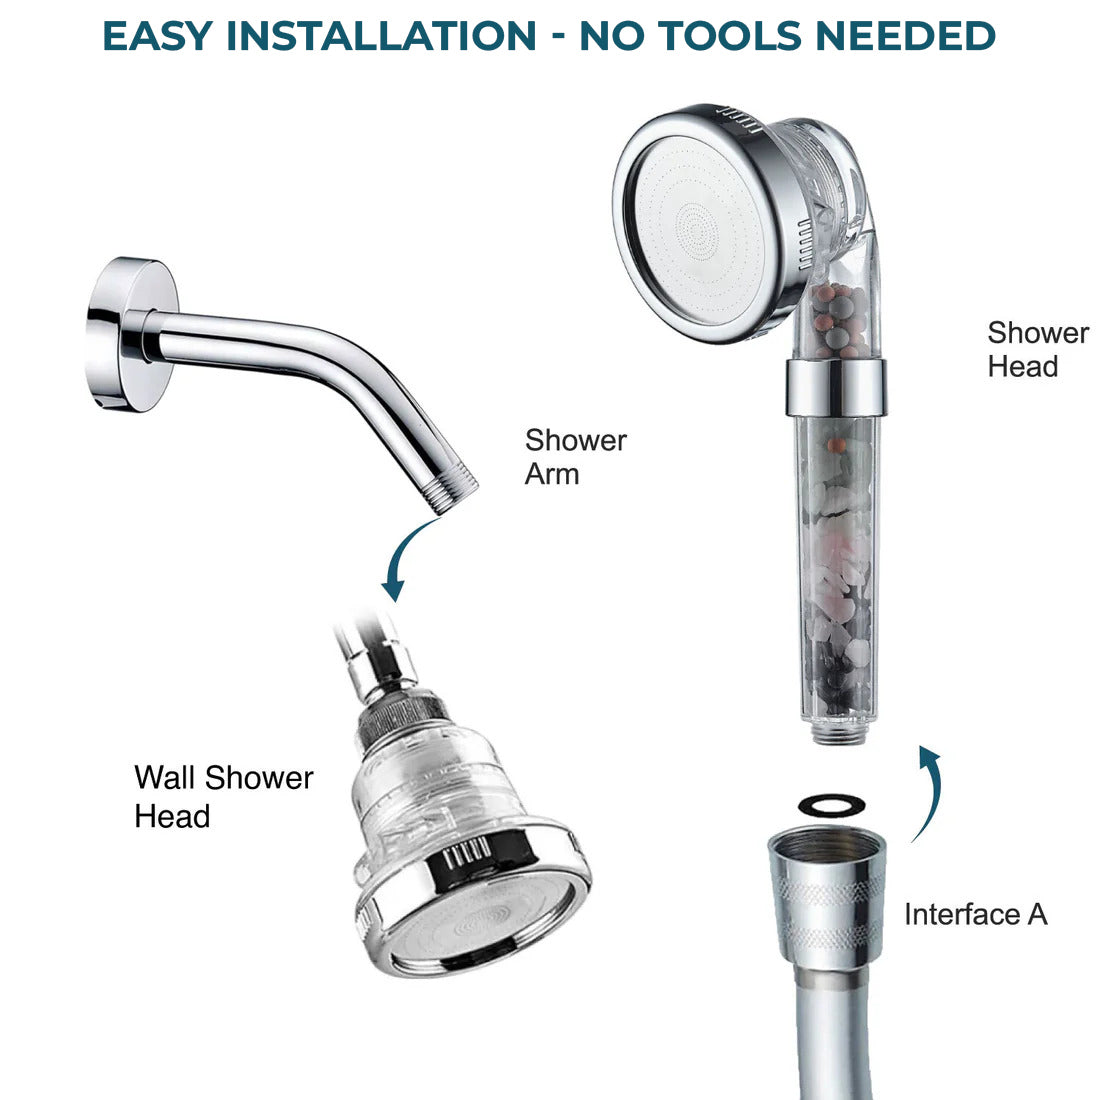
Instalando seu chuveiro MineralStream
1. Chuveiro de parede / Fixo
- Desrosqueie seu chuveiro atual do braço do chuveiro.
- Rosqueie o chuveiro com filtro MineralStream diretamente no braço do chuveiro. Aperte com a mão até ficar firme.
2. Chuveiro de mão (Ducha manual)
- Pegue o conector da Interface A e prenda-o na extremidade da sua mangueira de chuveiro. Aperte com a mão até ficar firme.
- Não são necessárias ferramentas. Conecte o chuveiro de mão MineralStream ao conector da Interface A. Aperte com a mão até ficar firme.
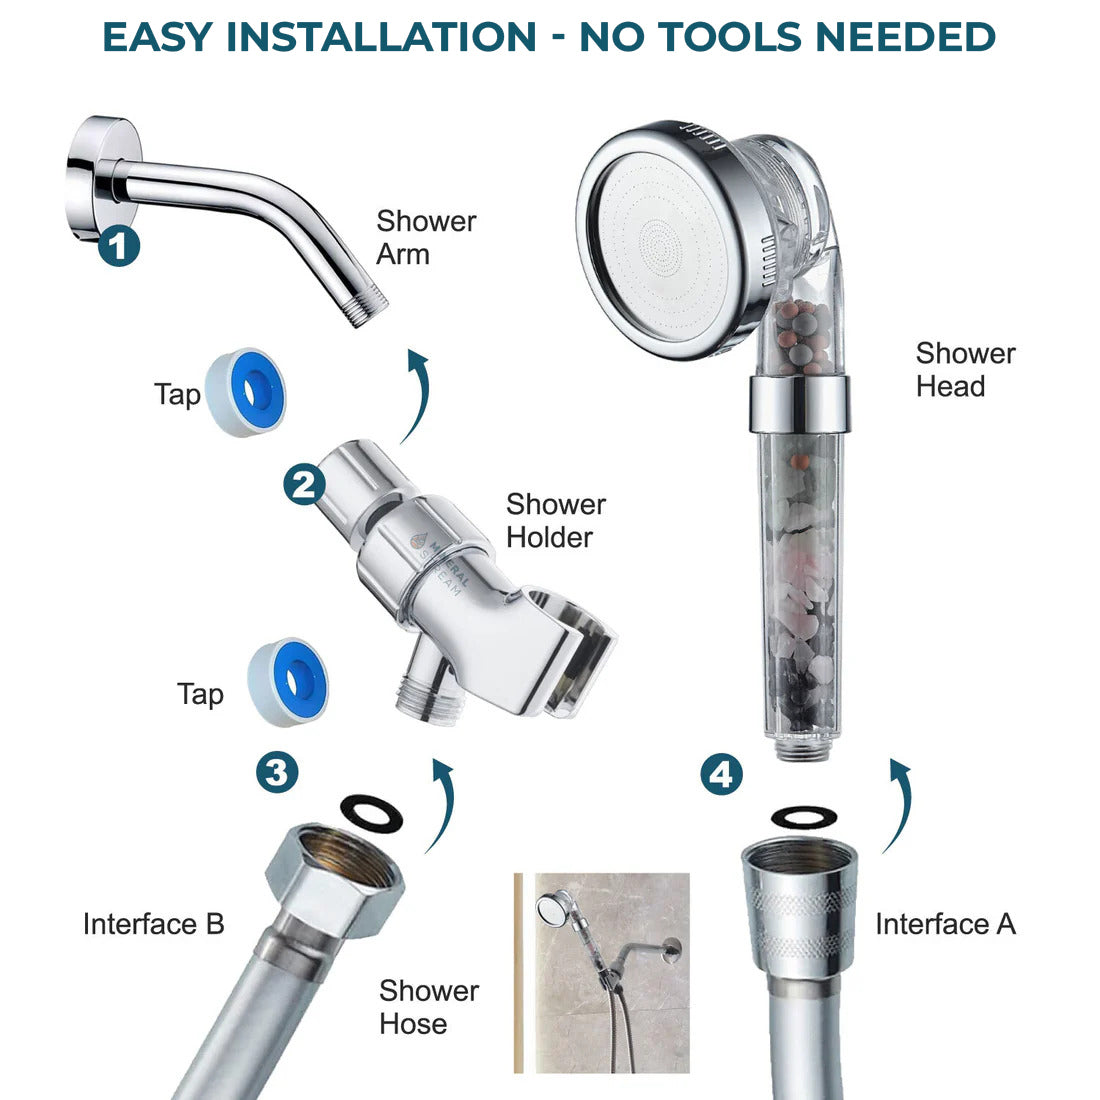
Instalação do Kit Essencial
Prepare a saída do chuveiro: Remova as peças antigas. Limpe e aplique fita veda rosca no sentido horário nas roscas. Rosqueie o suporte de montagem (se aplicável) e aperte com a mão.
Conecte a mangueira: Prenda a mangueira (com as arruelas) no sentido horário na saída do braço do chuveiro e no chuveiro de mão. Aperte ambas as extremidades com a mão.
Instale o suporte do chuveiro:
Ventosa: Limpe a parede e pressione firmemente para vedar.
Teste a instalação: Coloque o chuveiro de mão no suporte. Ligue a água e verifique se há vazamentos.
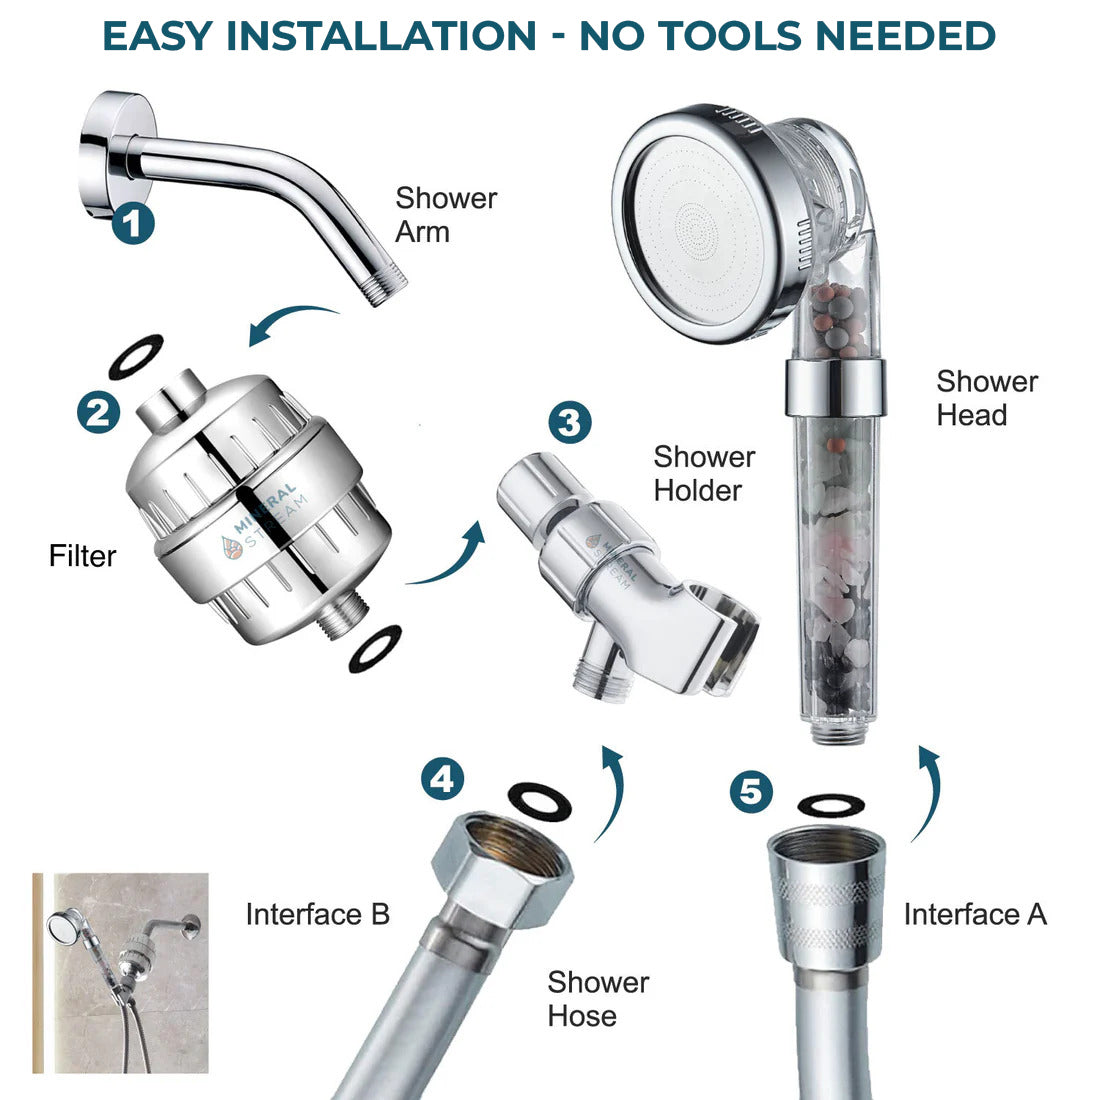
Instalação do Kit Completo
(Inclui: Chuveiro de mão, suporte, mangueira, filtro de água dura e, geralmente, um novo braço de chuveiro)
- Remova as peças antigas: Desrosqueie e remova o chuveiro antigo e (se aplicável) o braço do chuveiro.
- Instale o novo braço do chuveiro: Aplique fita veda rosca no sentido horário nas roscas do novo braço. Rosqueie o novo braço de chuveiro MineralStream no sentido horário no encaixe da parede e aperte com segurança.
- Fixe o filtro de água dura: Aplique fita veda rosca no sentido horário nas roscas da extremidade do braço do chuveiro e nas roscas de entrada do filtro. Rosqueie o filtro na saída do braço, observando a direção do fluxo, e aperte com a mão.
- Conecte a mangueira: Certifique-se de que as arruelas estejam presentes. Conecte uma extremidade da mangueira na saída do filtro e a outra no seu chuveiro de mão MineralStream.
- Teste a instalação: Coloque o chuveiro de mão no suporte. Ligue a água e verifique todas as conexões quanto a vazamentos.
Desfrute do seu banho totalmente filtrado e versátil!
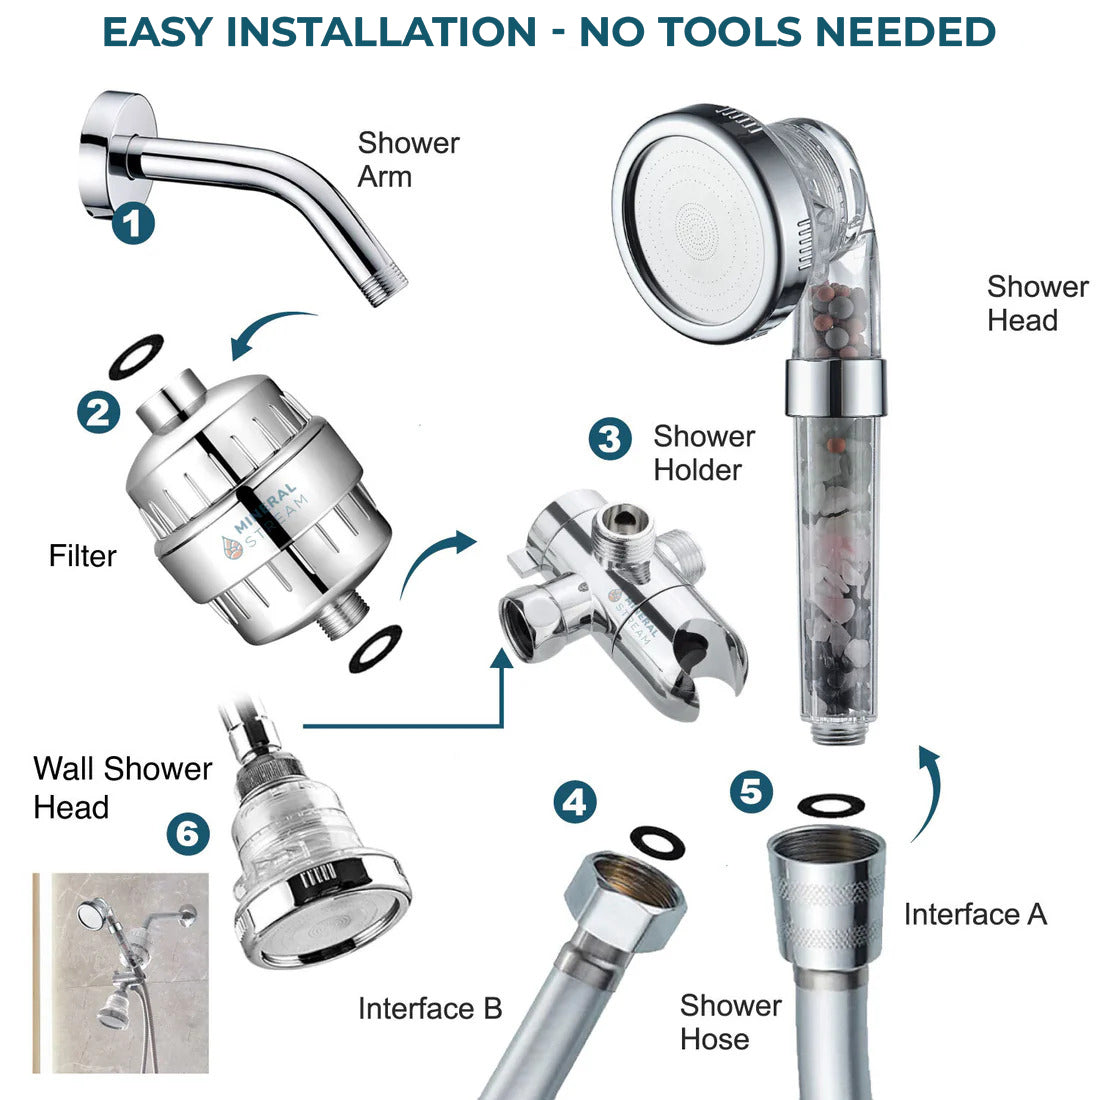
Instalação do Sistema de Chuveiro Duplo
(Inclui: Chuveiro de mão, desviador de 3 vias, mangueira, braço de chuveiro (para chuveiro fixo), filtro de água dura (geralmente para a linha de mão) e chuveiro de parede (fixo))
- Remova o chuveiro antigo: Desrosqueie o chuveiro existente.
- Instale o desviador: Aplique fita nas roscas do braço do chuveiro e rosqueie o desviador.
- Instale o chuveiro fixo: Aplique fita em uma das saídas do desviador e no novo braço do chuveiro. Conecte o novo braço ao desviador e o chuveiro fixo ao braço.
- Instale o chuveiro de mão e o filtro: Aplique fita na segunda saída do desviador e na entrada do filtro. Conecte o filtro ao desviador e, em seguida, a mangueira (com arruelas) do filtro ao chuveiro de mão.
- Instale o suporte: Posicione o suporte do chuveiro de mão.
- Teste: Ligue a água e teste o desviador.
Desfrute do seu sistema duplo!
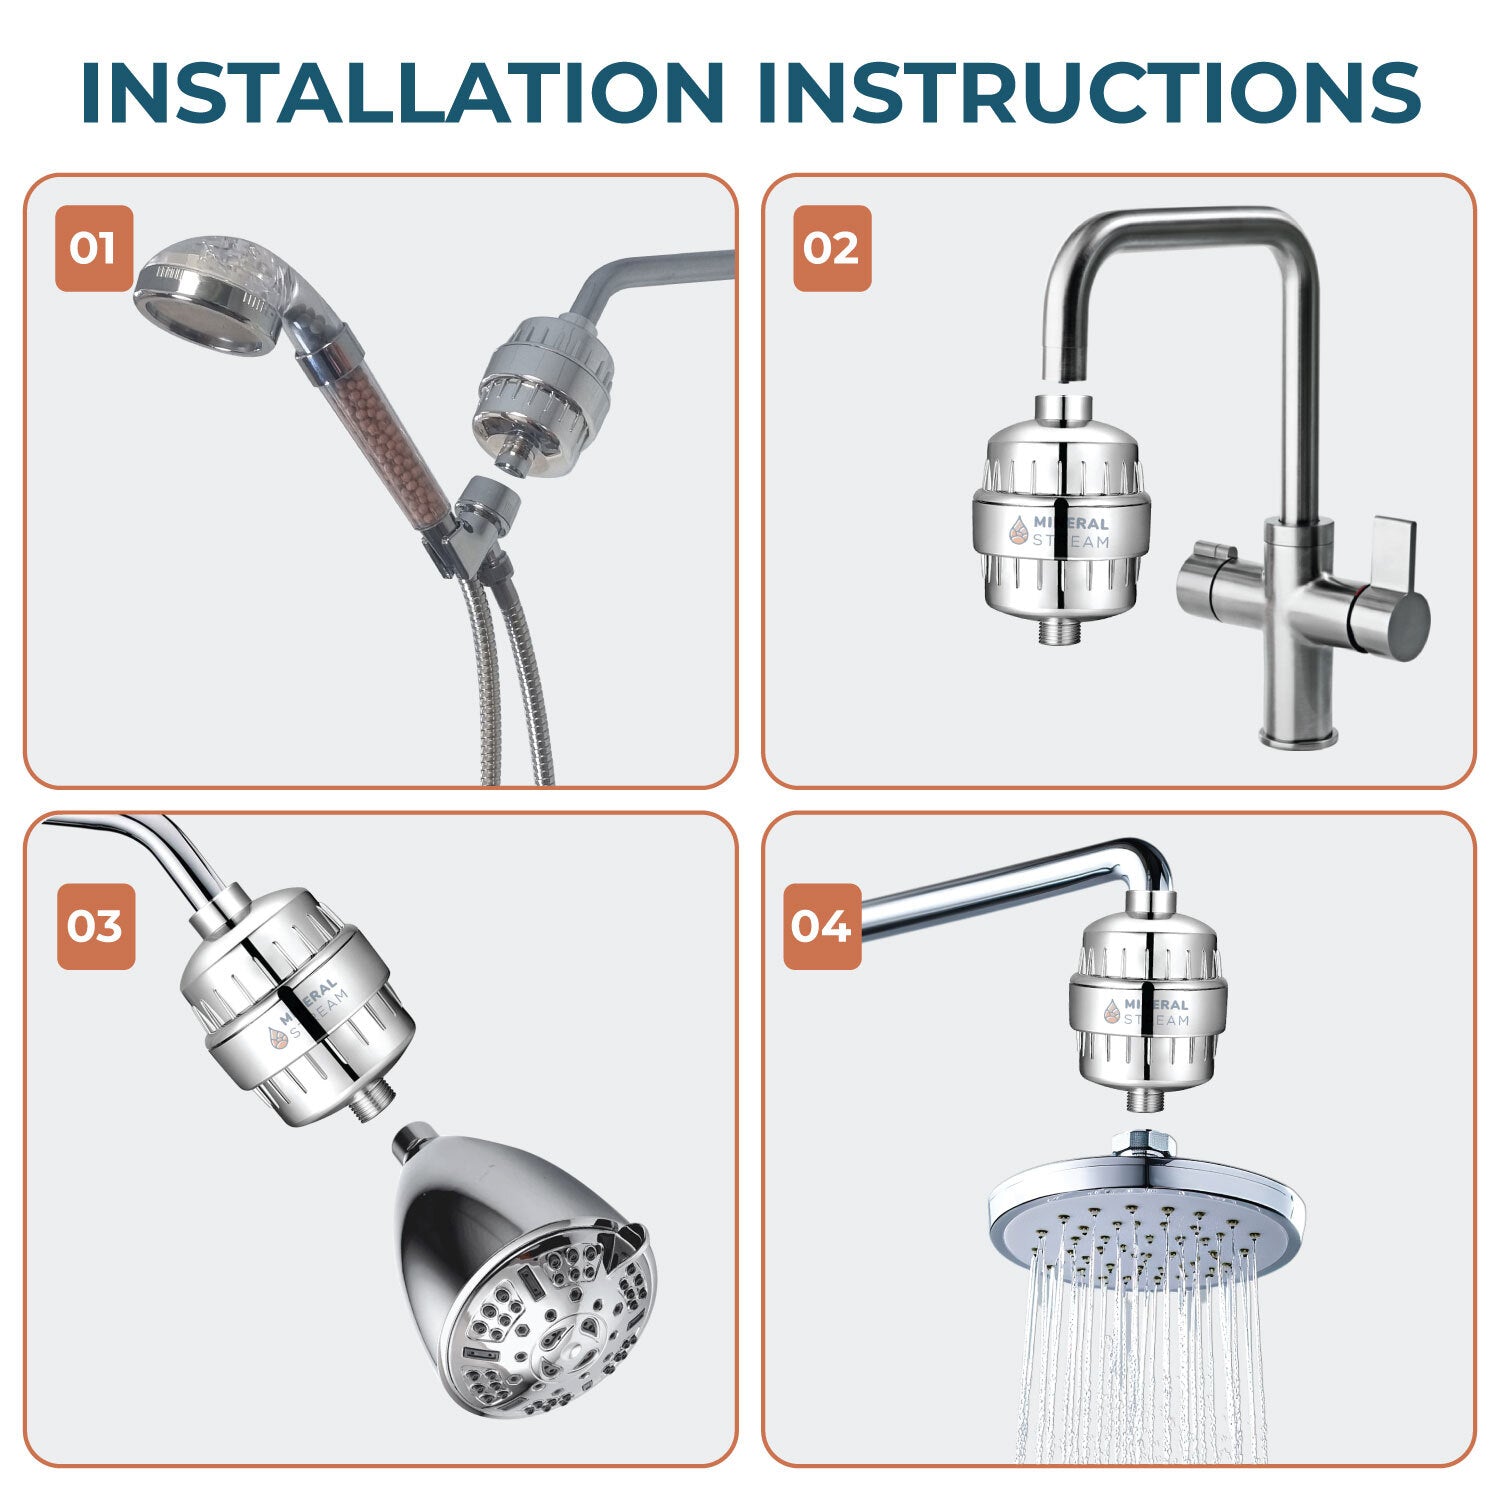
Como instalar seu filtro de chuveiro MineralStream
- Chuveiro de mão
Desrosqueie o chuveiro da mangueira. Conecte o filtro MineralStream entre a mangueira e o chuveiro. Aperte com a mão até ficar firme. - Torneira de cozinha/banheiro
Remova o arejador existente da sua torneira. Rosqueie o filtro MineralStream diretamente na saída da torneira. Aperte com a mão até ficar firme. - Chuveiro de parede fixo
Desrosqueie o chuveiro do braço da parede. Conecte o filtro MineralStream entre o braço da parede e o chuveiro. Aperte com a mão até ficar firme. - Chuveiro de teto (tipo chuva)
Desrosqueie o chuveiro do braço de teto ou de parede. Conecte o filtro MineralStream entre o braço e o chuveiro. Aperte com a mão até ficar firme.
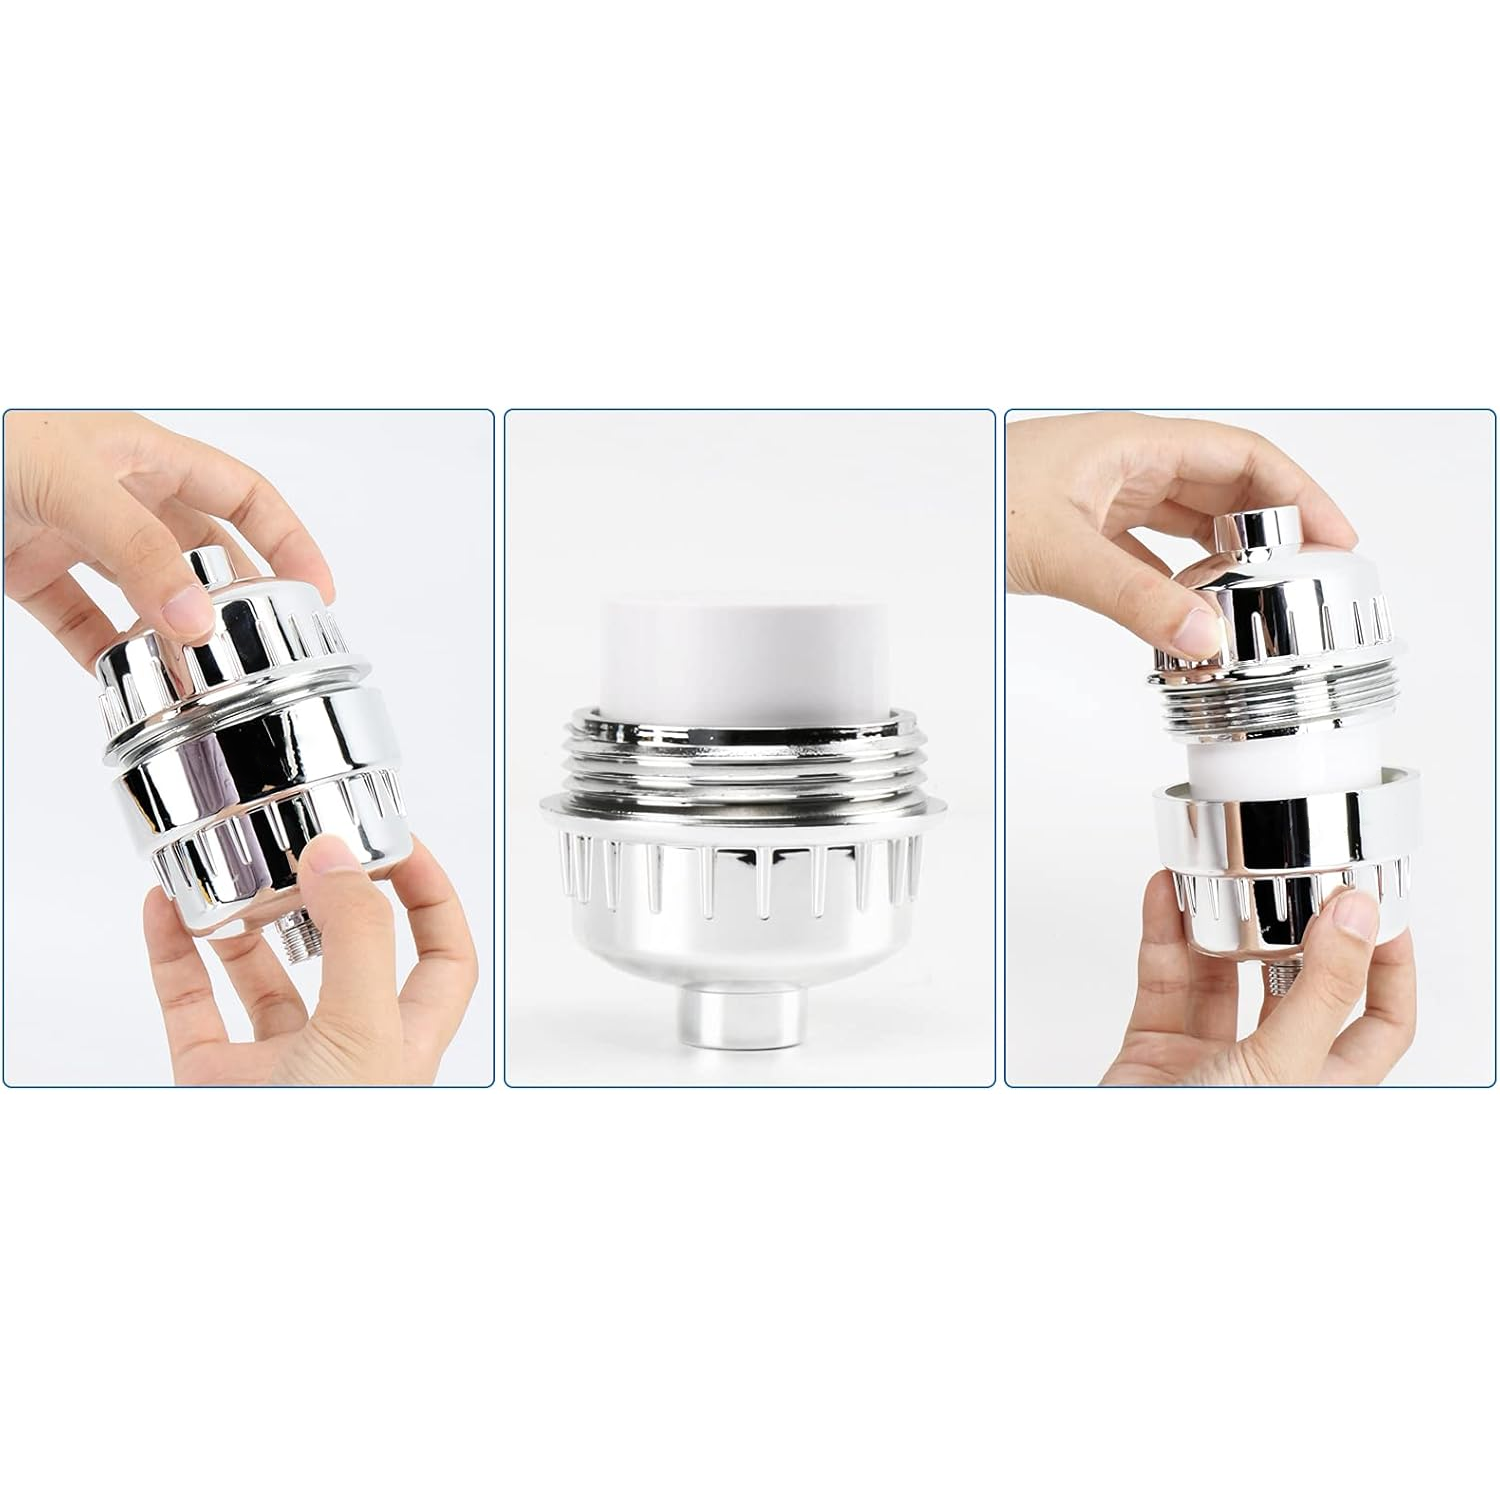
Como trocar o filtro do seu chuveiro MineralStream
- Desrosqueie a carcaça do filtro
Segure o filtro firmemente e gire a tampa superior no sentido anti-horário para abrir. - Remova e substitua o refil
Puxe o refil antigo e insira o novo na carcaça. - Monte o filtro novamente
Recoloque a tampa superior e gire no sentido horário até apertar com a mão. Seu filtro está pronto para uso.
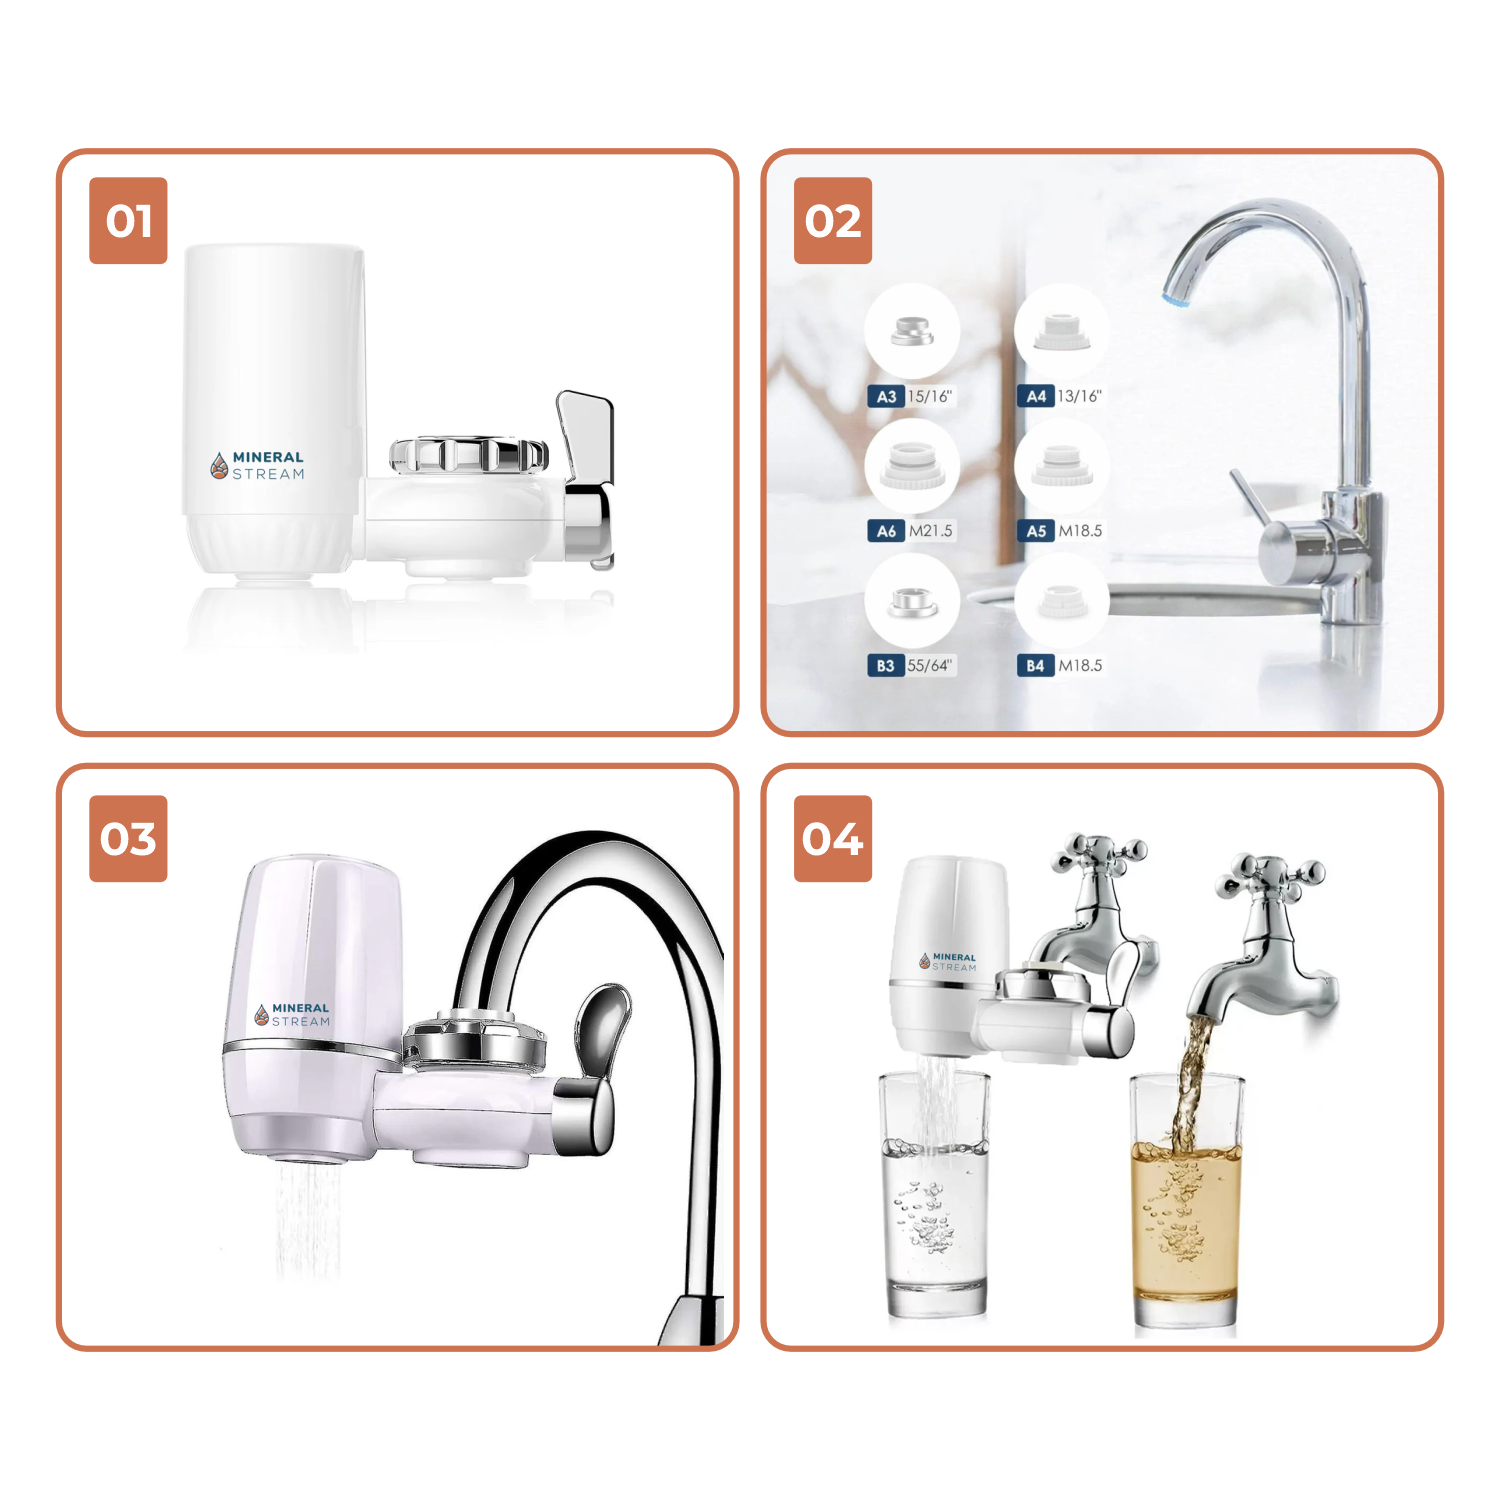
Como instalar seu filtro de torneira MineralStream
- O que vem na caixa
Seu filtro de torneira avançado MineralStream vem com a unidade do filtro, braçadeira de montagem e uma chave desviadora para água filtrada/não filtrada. - Escolha o adaptador correto
Selecione o adaptador correto para o tamanho da sua torneira entre os 6 incluídos: - A3 (15/16") — A4 (13/16") — A5 (M18.5) — A6 (M21.5) — B3 (55/64") — B4 (M18.5). Remova o arejador existente da torneira e rosqueie o adaptador correspondente. - Prenda o filtro à torneira
Deslize a unidade do filtro sobre o adaptador e prenda a braçadeira. Ligue a torneira para verificar se há vazamentos. Use a chave desviadora para alternar entre água filtrada e não filtrada. - Água limpa e filtrada instantaneamente
Seu filtro está pronto. A água filtrada é pura e cristalina, eliminando a necessidade de água engarrafada. Troque o refil a cada 3 meses para melhores resultados.
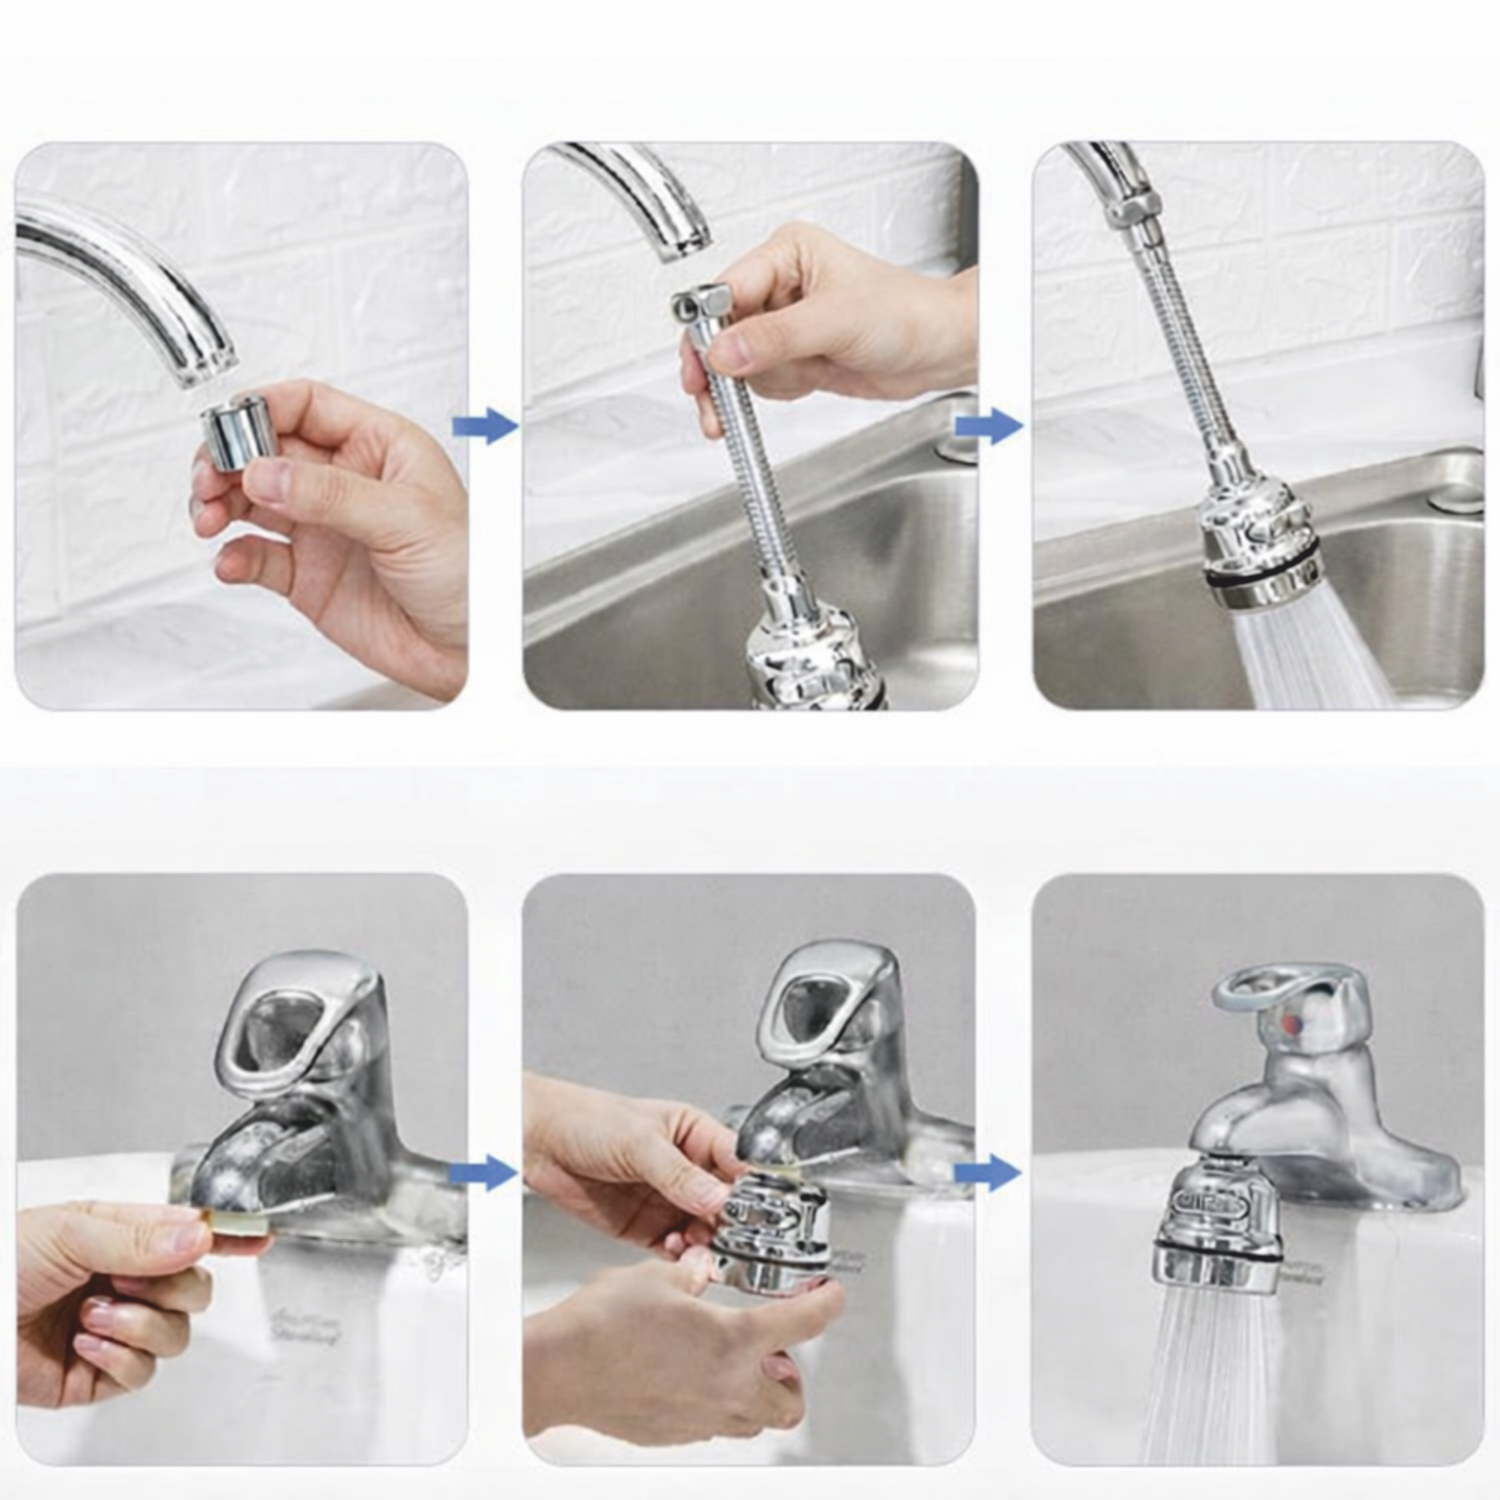
Como instalar sua nova torneira MineralStream 360°
- Remover: Desrosqueie a ponta da sua torneira atual (arejador) com a mão ou usando um pano para proteger a peça.
- Fixar: Rosqueie a unidade MineralStream diretamente na sua torneira ou anexe a mangueira extensora primeiro, se estiver usando.
- Apertar: Aperte com a mão até ficar firme. Não use alicates ou ferramentas, pois podem trincar a carcaça ou riscar o acabamento.
- Testar: Ligue a água. Se houver vazamento, verifique se a arruela de borracha dentro do conector está bem posicionada.